

3D TV and Cinema is a huge deal right now. It's the next big thing ( so why not see some big things in a whole new light!? :P ). I have seen 3D porn movies, and they blew me away! So, i thought it would be fun to experiment with it and show off my assets! You may have seen 2 posts on this blog, and i have just completed two more photoshoots, with 3D in mind.
It's not that hard to film in 3D in RL or to take photographs, and in SL the equipment is free of course in terms of your camera. Because the physics in SL, and angles, and perspective is the same as in RL the same principals can be used for 3D photography in the SL world.

All you need to take a 3D image in Second Life is a little practice on the camera control, static poses ( this is vital, i'll explain later. ) and finally photoshop.
Taking The Picture.
Step 1. Get on a NON ANIMATED pose ball, or animation script. Find your desired angle, and frame your picture in the traditional way.
Step 2. Take your snapshot, and save to your hard drive. Then, tap the right side arrow on your "Rotate camera Around" control. This will allow you to take an image with a slighly offset angle left to right. Take this snapshot and save in the same way.
Doing this creates the whole principal behind 3D photography. The first image represents your left eye, which you will make Red later. The second image represents your right eye, this one will be blue/cyan.
Trial and error, and practice will see you dial in the correct amount of camera movement between the pair of images.
In Photoshop
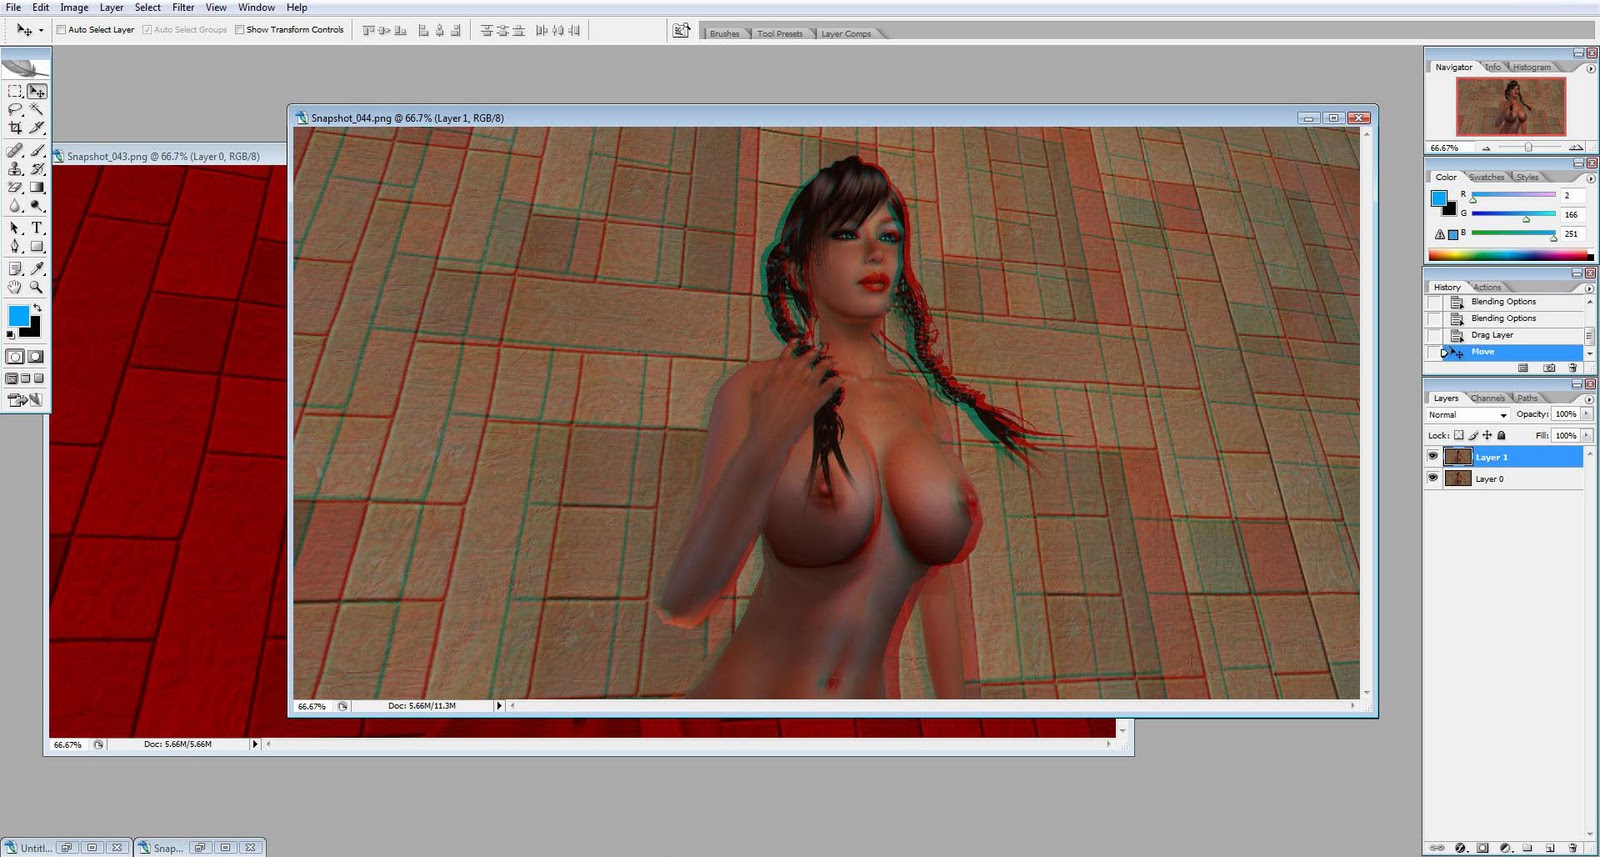
Step 3. Open the images in photoshop. Where you see the thumbnail and "background" down to the lower right in PS click and make it a layer. Once it's a layer, click on it again. This opens the "Layer Style" box.

In "Advanced Blending" you'll see check boxes for the RGB channels. Look at your snapshot numbers. the lowest we want to make red. So uncheck, both green and blue channels. You will see your image turn red. With the higher numbered snapshot, do the same, but uncheck the Red channel. Leaving Blue and Green. This will leave you with a cyan tinted image.


Now, just simply drag and drop one layer on to the other. I drag the red to the blue, but i doubt it matters. Line up the images, and view with your Red and Cyan 3D glasses.
If you have shifted your camera enough, you'll see depth in the image and a 3D effect. if you've over done it, you'll see the image is not so clear, it'll be blurry, and hard on the eyes. You'll have to fine tune this yourself while doing your photography to get a nice balance between clarity of image and 3D depth.
With your glasses on, you can now process the image to suit your tastes, also some processing can help the 3d effect, such as brightness, and contrast, or de saturating. All images are different, experiment and find the best looks. save your image, same as always, in whatever way you do things.

And you're done. :)
If you have a real desire to be in a 3D pic..I am more than happy to chat in world. Or via comments here.
Indian Xnxx Hot Desi 3x Sex Xxx 3gp mp4 HD Video Free Download
ReplyDelete»------------ European Sex (137)
»------------ Cumshot Sex (107)
»----------- Blowjob Sex (311)
»------------ Hot Sites (Ads)
»------------ Sex In Office (762)
»------------ Teen Sex (277)+7
»------------- Pornstar Sex (910)+10
»------------- Lesbian Sex (223)+22
»------------ Hardcore Sex (386)
»------------- European Sex (137)
»------------ Cumshot Sex (107)
»------------- Blowjob Sex (311)
»------------- Big Tits Sex (334)
»------------- Hot Sites (Ads)
»------------- Sex In Office (762)
»------------- Teen Sex (277)+7
»------------- Pornstar Sex (910)+10
»------------- Lesbian Sex (223)+22